
Indian Summer Quilt Pattern
- Katie Done
- Oct 13, 2022
- 4 min read
Updated: Feb 23, 2023
Indian Summer is the latest collection from the Craft Cotton and Victoria & Albert Museum collaboration. Inspired by the Indian Textiles Exhibition, ten new organic cotton prints have been created.
My brother is engaged to be married into and Indian family next year so, when I heard about this collection I was excited to get my hands on it and make them something special to celebrate. I wanted a quilt that incorporated the full collection and I have come up with this design. Initially I wanted it to feel quite random but it is so hard to make something look good and random. So, I ended up with a repeated pattern.

Seam Allowance: 1/4"
Finished Size: 125cm x 166cm
YOU WILL NEED
Cutting mat
Rotary Cutter
Quilting Ruler
Sewing Machine
Pins
Curved Safety Pins
Wadding - 1 1/2m
Backing Fabric - 1 3/4m
Fabric:
Varanasi Pink - 75cm
White Love Birds - 1m
Ochre Leaves - 75cm
Whimsical Flora White - Long Quarter or Fat Quarter
Belle Flower - Long Quarter or Fat Quarter
Floral Sprig Peach - Long Quarter or Fat Quarter
Floral Sprig Olive - Half Metre
Jaipur Flower Sage - Half Metre
Ochre Marigolds - Half Metre
Love Birds Sage - Half Metre
Confederate Plain - 75cm

METHOD
1. Cut your fabric as follows:
Varanasi Pink - 9" Squares x9
White Love Birds - 9" Squares x13
Ochre Leaves - 9" Squares x3
Whimsical Flora White - 9" Squares x4
Belle Flower - 9" Squares x4
Floral Sprig Peach - 9" Squares x2
Floral Sprig Olive - 4" Squares x 35
Jaipur Flower Sage - 4" Squares x 35
Ochre Marigolds - 4" Squares x 35
Love Birds Sage - 4" Squares x 35

2. Now you need to add the half square triangles to the corner of each 9" square as follows:
Top Left - Ochre Marigolds
Top Right - Love Birds Sage
Bottom Left - Jaipur Flower Sage
Bottom Right - Floral Sprig Olive
To do this get one large square and one of each of the 4 smaller squares. Line up the corners and sew diagonally from corner to corner. To ensure that the pattern stays the right way up on all your squares, line them up as I have pictured.


3. Trim the corners off, leaving 1/4" seam allowance.

TOP TIP Trim your offcuts into 1 3/4" squares ready to create a matching cushion or any other patchwork creation.

4. Press your seams outwards.


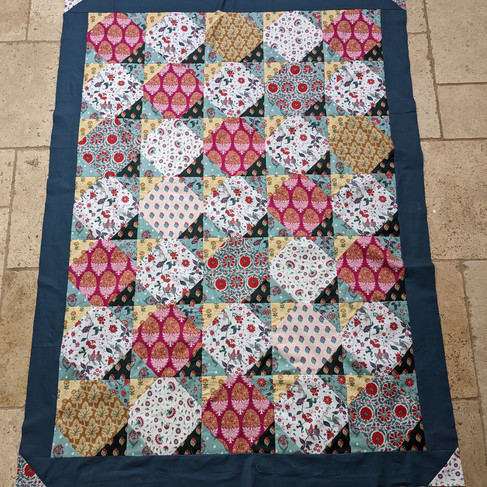
5. Lay out your squares as shown, ready for sewing.

6. Sew rows together first. Press seams open.

7. Now sew all these rows together and press your seams open again.


8. When I create a quilt I have a good idea and plan in mind, but it often evolves. I loved it at this point but, it felt like t needed a border. The patterns are all quite busy so, I didn't want to over complicate it by adding more pattern. This plain cotton is called confederate and is really underrated. I have used it a lot but could not tell you what colour it is. I think somewhere in-between blue, green and grey and that is why it goes with everything.
Cut 4" strips, full bolt width, you will need to join two together for the long edges. Add the long edges first.

9. With the bits you trim off the sides, add these to two more strips and then add it to the top and bottom.

10. I used some of my left over 4" squares to add a half triangle to each corner to soften the edges.


11. Your quilt top is done. Now to finish off in whichever way is your preferred way. I have used mid-weight 80/20 wadding from Bosal and a wide cotton poplin for the backing.
Smooth out your layers as much as possible and then again to endure you don't get any puckers. I use curved safety pins to baste the layers together.

12. It always takes me ages to decide how to quilt a finished patchwork. I have stuck with what I know and gone with diagonals. I always enjoy the way it knits the fabrics together. It also means less prep work because you can just aim for the corners. To avoid wobbly lines on the border I have used my quilting ruler to mark the lines over the.


13. When you have finished quilting, trim your edges.
DISCLAIMER: I got distracted by something and ended up trimming my quilt before I had quilted! I have never done this before but thankfully I had basted well and the fabric didn't shift so it turned out OK still.

14. For the binding, I went with one of the golden brown prints. It isn't a colour I would usually go for but when it comes to Indian fashion and design, you often see gold trim and I thought this would reflect that same idea.
Cut 6 3" strips, full bolt width (I don't cut on the bias when I don't have any curved edges) and press it in half with wrong sides together.
I think sewing binding is a personal preference. I change my method depending on the quilt I am making and how much time I have. This time I have sewn it to the back, pressed it to the front and hand stitched it in place.


Your quilt is finished! I would love to hear from you if you give it a go or are feeling inspired by this collection. Make sure you are subscribed if you don't want to miss out on new free tutorials, new fabric and special offers.


Comments