
Alphabet Baby Quilt - Free Pattern
- Katie Done
- Apr 28, 2019
- 5 min read
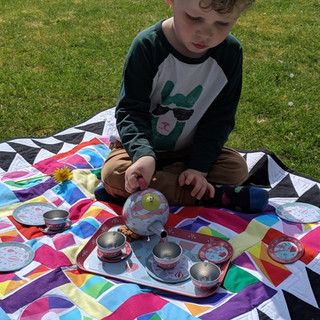
When babies are born they can only see blurry images and, much like everything else they have to learn, focusing on objects is a skill they have to develop. Although they can see colours, they will be able to see images much better if they are contrasting. At first look this doesn't look like an obvious baby blanket choice, but with the black and white and contrasting geometric shapes and rainbow colours, it could be great for stimulating growing babies. Since it features the alphabet and a really funky unisex colour pallet, it will have a great place in any kids room as they get older too.
This was inspired by the Zoometric collection by Northcott fabrics. The fabric quality is fab and the panel includes several of most letters, so there is potential for other projects too. I have used it to make my brother a pencil case, which you can also find a tutorial for here. I still have a few letters left, so I will need to play a game of Countdown and work out what else I can spell out.


YOU WILL NEED
METHOD
1. Start by cutting out your letters. For accuracy, you will need a quilting ruler and rotary cutter to do all your cutting out. All letters are 4 ½" tall. I have listed the width of all the letters below. The part in brackets is explained in step 2:
A - 5" (purple 2")
B - 4" (turquoise 3")
C - 4 ½" (pink 2 ½")
D - 4 ½" (turquoise 2 ¼")
E - 4 ¼"
F - 4 ¼" (pink 3")
G- 4 ¼" (red 2 ½")
H - 5 ¼" (yellow 3")
I - 2 ¾" (red 3")
J - 4"
K - 4 ¼" (green 2 ¼")
L - 4" (pink 2")
M - 6 ½" (red 2")
N - 4 ¾" (yellow 2")
O - 4 ¼"
P - 3 ¾" (turquoise 2")
Q - 4 ¼" (yellow 1 ½")
R - 3 ½" (green 1 ½")
S - 3 ½" (purple 2")
T - 3 ½" (pink 2")
U - 4 ½"
V - 4 ½" (yellow 2")
W - 6 ½" (turquoise 2")
X - 4" (green 3")
Y - 4" (red 2")
Z - 4"

2. Cut 4 ½" strips of hot pink, red, green, turquoise, yellow and purple and then cut them in the following widths:
1 ½" wide x 2 (1 yellow, 1 green)
2" wide x 10 (2 purple, 2 pink, 2 red, 2 yellow, 2 turquoise)
2 ¼" wide x 2 (1 turquoise, 1 green)
2 ½" wide x 2 (1 pink, 1 red)
3" wide x 5 (1 turquoise, 1 pink, 1 yellow, 1 red, 1 green)
I have listed what colour and width will be sewn to the right hand side of each letter in brackets next to the letters above.

3. I have used a ¼" seam allowance throughout the quilt. Sew your letters to the corresponding edge. Press your seams open.
4. I have staggered the letters by adding a coloured strip to the top and bottom of each letter. The only way I could get this to be square was to combine R and S so you can sew those together now.
If you are using the exact colours I am and want to keep the placement the same, the easiest way to do this is to cut 2" wide, full width of fabric long, strips and chain stitch all the colours together, I have listed which letters have what colours below.
If you have used different colours you may want to lay them all out and work out where they are going to go. I cut the strips to size with scissors, slightly longer than I needed and placed them on the quilt until I was happy. I have pressed the seams open and trimmed them neater afterwards.

Purple Top - N, Q
Purple Bottom - C, U, X
Green Top - I
Green Bottom - A, O, P
Pink Top - B, W
Pink Bottom - H, E, Z
Red Top - D, T
Red Bottom - F, V
Turquoise Top - L
Turquoise Bottom - J, R&S
Yellow Top - G, Y
Yellow Bottom - K, M


5. Sew your rows together as follows:
A, B, C, D, E
F, G, H, I, J
K, L, M, N, O
P, Q, R&S, T, U
V, W, X, Y Z
Press seams open.

6. Pin and sew your rows together. Press seams open.

7. Now to work on your border. I have chosen to use flying geese blocks pointing clockwise all the way round the quilt and the black and white geometric animals from the same collection as the panel in the corners.
Cut the following:
Black - 6½" squares x 20
White - 3½" squares x 80
Black and White Animals 6" squares x 4
8. This is a great easy method to make up this block in bulk. I will show you start to finish but when you have mastered one, you will find it easier and quicker to do each method in one go.
Place and pin a white square on opposite corners of the black square. They will overlap in the centre. Use a fabric pen and ruler to draw a line through the centre.

9. Sew a ¼" either side of the line. Cut down the centre and press the seams open.


10. Place another white square in the corner of the black. Draw another diagonal line as shown and sew ¼" either side of it. Cut down the line and press open.


You should end up with 40, 10 for each side.
11. Ensure they are all facing the same direction and sew 4 rows of 10.
12. Sew a Zoometric square to each end of the top and botton row. They should be facing in opposite directions. Press seams open.
13. Sew on your sides first. Press.

13. Sew on your top and bottom rows.
That is your quilt top done!
It took me a few more months before I committed to quilting it. I think how you quilt is quite personal, so do what you are happy with.
I used white thread and quilted around all the letters. I hand sewed in all the end threads so it took quite a while, but not as long as the borders. I started on one of the corners and sewed in straight lines, pivoting at the corners, all the way around into the centre of each white triangle. It took forever but it was totally worth it. The contrast in textures from doing this all help with the baby-sensory feel to the quilt too.
I used simple black binding to frame it and I am really happy with the final quilt. I actually binded it differently to how I usually do and I am converted. I used 2½" inch binding, ironed it in half and sewed it onto the front of the quilt. I pressed it to the back and sewed in the ditch on the front of the quilt. It gives it a really professional finish without being worried about my hand quilting standing up to baby and toddler hands.


I would love to hear from you if I have inspired you to make this quilt. For more free tutorials, new fabric arrivals and special offers, make sure you have subscribed to the mailing list.


Comments