
Easy Toddler Shorts
- Katie Done
- Jul 3, 2018
- 3 min read
I have seen so many requests on sewing groups for short patterns that I thought I would share an easy peasy pattern with you. I have included a PDF for around aged 2 however, I will show you how to make your own pattern if you need a different size.
I have this fab nautical fabric that I thought would make the perfect pair of shorts for my little man on our recent day trip to Skegness. I made these the night before in less than an hour so they are a great beginners project.


You will need:
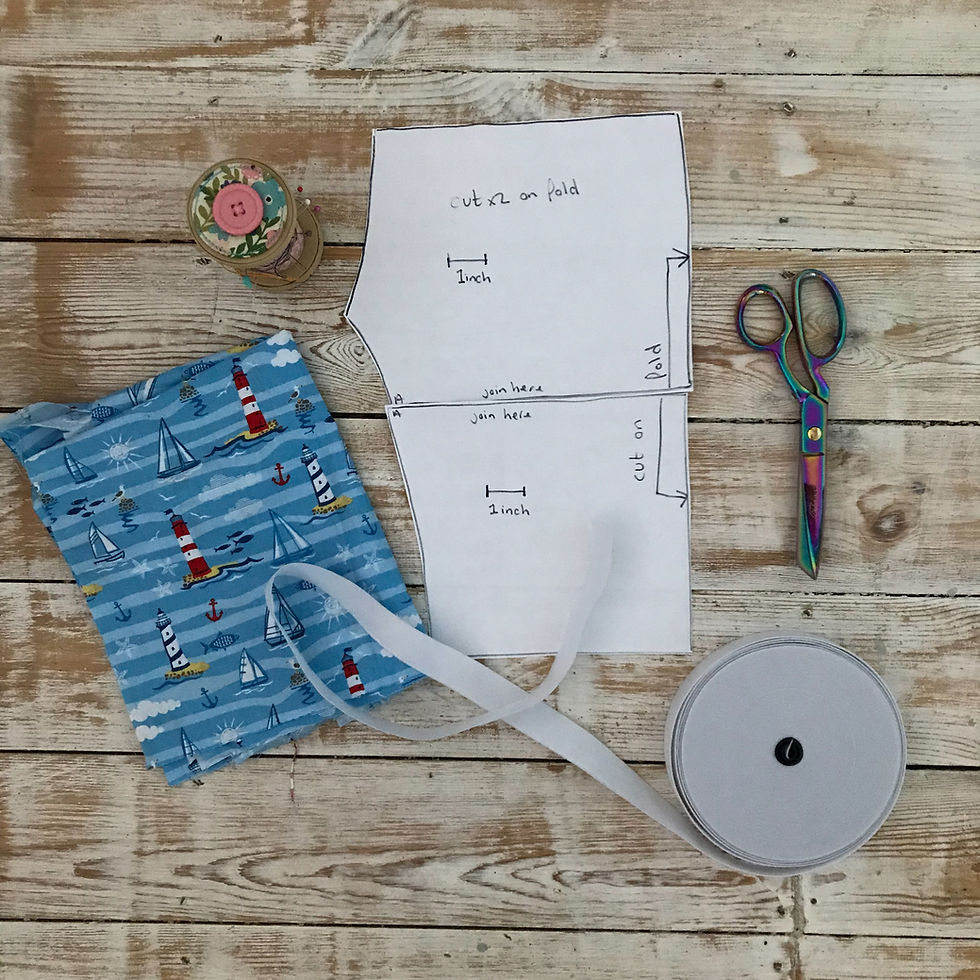
- 1metre of cotton fabric
- 19" of 1" wide Elastic
- Fabric scissors
- Rotary cutter (optional)
- Pins
- Sewing machine
- Iron
1/2" seam allowance throughout
INSTRUCTIONS
1. Print the pattern which will open when you click on the image of what you will need above. Skip to instruction 3. Alternatively create your own in step 2.
2. Get a pair of shorts that are the right size to use as a guide. Fold them in half along the crotch and press them out as flat as you can. With paper or tracing paper (some Ikea furniture comes in great pattern making paper!), draw around your shorts adding an extra 2" along the top, 1" along the bottom and half an inch everywhere else. See the pattern I have created below to give you an idea of the shape you are after.
3. With your fabric folded wrong sides together cut around your pattern on the fold, twice, giving you 2 pieces.


4. With right sides together, sew your two pieces together from the top to the crotch point. This seam will be the back and front seam. Finish your edge with a zigzag stitch or serger.

5. You now need to make the legs. Match up the crotch seams and pin, as pictured. Sew and then finish your raw edge.

6. Turn up the short hem by 1/2"and then again, press. Repeat on the other side and sew a straight stitch evenly all the way round each leg.
7. Turn your waist band over by around an inch and then again, press, ensuring the elastic width will fit as this will create the elastic casing. Sew all the way around leaving a gap big enough for the elastic to fit through.

8. I have done the elastic the same length as my little mans waist so when I sew it together it will be slightly smaller and should be the perfect fit. Attach a safety pin to the end of your elastic and feed it through the casing you have just made. Be sure to keep hold of the other end!
9. Once both ends are out, remove your safety pin and sew them securely together, overlapping by around 1/2".
10. Close the opening. Manipulate the fabric so it gathers evenly all the way around. I have also sewn in the seam ditch over the elastic front and back to prevent the elastic from twisting.
Turn them the right way, give them a press, ta da!

Alternatives:
- Use the short hems as casing for some 1/4" elastic and insert a 12" piece of elastic to each leg. This creates a great girlier style.
- To make the most of a small piece of fabric, don't cut on the fold. Make 4 pieces instead of 2 and allow a little extra seam allowance so you can sew them down the side seams.


Comments