
Bugs and Butterfly Quilt Tutorial
- Katie Done
- Jul 17, 2019
- 4 min read
I have been loving the collaborations from The Craft Cotton Company and the Natural History Museum over the last year. This Explore the Tropics is the third collection they have released together. It is full of fun vibrant colours in pink, blue and turquoise. There are butterflies, bugs and birds and as with all the other collections they include facts and names of the animals featured in the prints.

The first collection was Explore the Plains featuring dinosaurs, followed by Explore the Oceans with a gorgeous blue and turquoise pallet featuring creatures of the sea and ships. I have a whole page dedicated to the Natural History Museum fabrics so make sure you check them out.


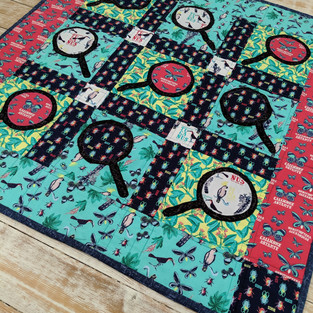
I was very quick to put my hand up when asked if anyone would like to make something with this fabric. I speak about our secret garden quite a lot, we spend a lot of time in the garden. My little boy loves this bug kit he got for has birthday which includes magnifying glasses so he can look at the bugs he finds in the garden. That is what gave me the inspiration for this quilt. I loved the idea of magnifying glasses to explore the tropics with. I got the very first samples of this fabric so I had around half a metre to a metre of each to play with. The quilt top could be made using half a metre of each but a little more for the border fabric. I have pieced the leftovers for the backing fabric but you will need another metre of one of the fabrics to back it with if you want one piece. The finished quilt is approximately 95cm x 95cm making it a small lap size quilt or a toddlers secret garden tea party size.

YOU WILL NEED
Border Fabric 1 Metre
Backing Fabric 1 Metre
2.5" wide Binding 4.5 Metres
Sewing Machine
Iron & Ironing Board
Sharp Scissors
Rotary Cutter, Mat and Ruler
Wadding 1m square
METHOD
1 - Cut out fabric - You will need to cut out the following:
x5 Yellow 8" Squares
x4 Turquoise 8" Squares
x6 Blue Bugs Vertical 3" x 8"
x6 Blue Bugs Horizontal 3" x 8"
x 4 White 3" Squares
2 - Draw template onto Bondaweb - Make your template on paper. I made the circle on my magnifying glass 12.5cm wide. The stem was 8.5cm x 1.5cm. The smaller circle in the middle was 10cm (the coaster in my craft room just happened to be the perfect size so I used that as my template). Draw around the templates on the paper side of your Bondaweb. You will need 9 of each.

3 - Iron on Bondaweb - Iron the magnifying glasses onto the back of black fabric following the instructions depending on the brand you use. I have used a blender with a texture on it but you could use a solid black or grey. I used my back up fabric scissors to but them out. I don't like to use my best ones on the paper backing.

4 - Cut out circles - For the circles you will need to be more careful with your placement. Cut the circles of Bondaweb out but do not cut them right up to the pencil line. I have used 3 from the blue, pink and white and made sure I have a variety of images and facts in the centre of the circles. Iron them onto the back of your fabrics and carefully cut them out.

5 - Layer up your squares - Work out what direction you want your magnifying glasses facing and the layout of your patches. This is the layout I have chosen.

When you are happy, remove the backing from your Bondaweb and iron all three layers into place.

6 - Zig zag - finish off the edges of your applique in your desired way. I like to use a zig zag stitch around all the edges using my sewing machine. I have changed the threads on the different fabric backgrounds so they blend in well.

7 - Piece patchwork together - Lay out your patches ensuring the blue bugs are facing the right way. Sew the rows together first and then sew all the rows together.

8 - Add a border - I didn't have quite enough fabric left to do the whole border in one fabric so I picked the turquoise and pink. I used the blue in the corners.
Cut 4 squares 5.5" and 4 pieces for the border 5.5" x 27.5".
Sew the top two squares and top border piece first, then the same with the bottom. Sew the sides onto the main panel and then sew the top and bottom pieces to the pain patchwork.

9 - For the back of the quilt I have pieced together all the leftover bits I had to work with. There was no particular pattern or thought process other than to make the most of the fabric I had left. I loved how it turned out.
Baste your top, wadding and backing together and quilt in your desired style. I have quilted half an inch either side of the seams and binded it with 2.5" wide navy blue.
When I showed my little dude the finished quit he said "wow!", he knows how to humour me but he did genuinely love it and got his magnifying glass out of his bug bag straight away.
For more free tutorials, fabric updates and special offers, make sure you have subscribed to my mailing list.


Comments