
Folded Fabric Ornament
- Katie Done
- Dec 9, 2020
- 3 min read
Updated: Apr 14, 2025
After a trip to a local farm to tag our Christmas tree, which was a first for us, I felt like I needed to make a new decoration. Every year I add at least one new homemade decoration and one homemade small business decoration. I have already bought my small business one from a lady that made us some a few years ago and I needed to add Alfie to the tree. I had these green, red and gold fabrics in my Craft Cotton stash and had an idea that I wanted to try out. They aren't fabrics I would usually go for but I was so happy with how they turned out and I love the traditional colours, they will look fab on our tree. These took me around half an hour and George even helped me make one in some dinosaur fabric. So, not only are they a great scrap busting project, they are really quick too.

YOU WILL NEED
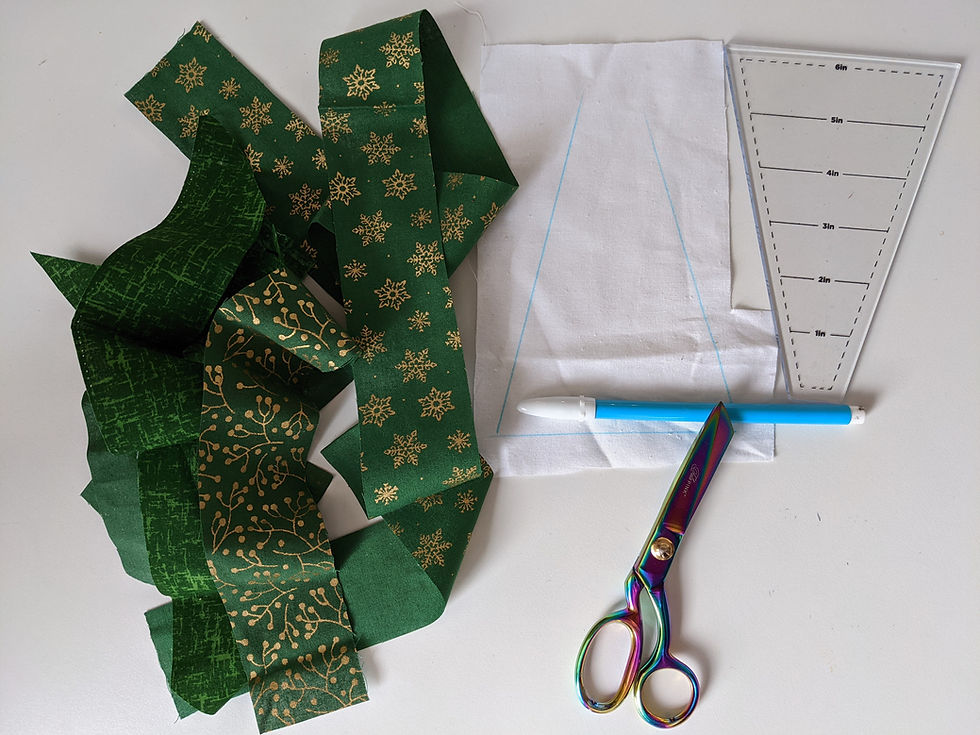
2" wide fabric strips
Sewing machine
Plain cotton
Dissolvable pen
Ribbon
Bosal interlining
METHOD
1. You will need 2" strips of fabric in any colours you like, or thereabouts. There is no need to be exact with the width, just go with any bits you have. Along with this you will need a piece of fabric that is slightly larger than the size of the finished ornament you want. I just used some plain white.
2. Draw the shape you want on the white fabric. I have drawn various shapes but since I got a dresden ruler in this months Love Quilting magazine and it is a great Christmas tree shape, I used that as a template.
3. Cut down your strips to 2-3" long, fold them in half lengthways and use your finger to crease them. For round shapes, start in the centre. For this tree shape I started at the bottom. Layer them on top of each other, sewing them with 1/4" seam allowance. Keep sewing them on top of each other, ensuring you cover the stitch lines from the line before. Hopefully this sped video helps.
4. Top stitch just inside of the design you have drawn. You may need to draw it again if you can't see it through the fabric. Trim your shape.

5. You can add embellishments to make it even prettier. I have added extra ribbons and buttons to a few of mine. For the tree I have added button baubles and a star button I found in one of my jars.

6. I used Bosal double sided iron in foam. I love this stuff and use it all the time but if you don't have any you can use any wadding to add a bit of thickness. Sandwich it between your ornament and some coordinating backing fabric. Add a folded over piece of ribbon to the top part and top stitch it into place. Iron the layers together.
7. You will still need to top stitch around the edges, I have had a play with some of my fancy stitches but you could use any you like.
8. Cut out your ornament to the desired shape and you are ready to hang it.


For more free tutorials, new fabric arrivals and special offers, make sure you subscribe to the mailing list.


So the edges are raw? Or did you put the batting and batting on and turn it inside out? I’m not sure
Thanks..I want to try it
this is cute and easy. Think make some for this years tree