The Mary Dress Tutorial
- Katie Done
- Dec 16, 2020
- 4 min read
A new collaboration from the Craft Cotton Company and V&A brings this gorgeous new Alice in Wonderland collection. It consists of 5 prints with images that have been taken from the original artwork found in the V&A archives. I was lucky enough to be sent all five prints to play with a specific request for a dress made from the white floral one. I had a metre of full width material to work with so, I got drafting a pattern. I liked the style of dress that Alice wears, but the apron would cover most of the design and I thought it would be too busy to use one of the other patterns. I liked the shape the apron made on the top half so I thought I would try creating the shape without the actual apron and just add frills instead of ties. I decided to attempt my own pattern after a quick sketch. I have only ever made simple patterns before, so this was quite a challenge.
It has been a few years since I made my friends little girl Mary a dress and she still regularly requests to squeeze into it so, it was about time she had another better fitting Nana Katie make (they call me Nana Katie). During a pre lockdown 2.0, socially distanced (of course), craft night with my crafty friend I used a dress that Mary currently wears as a guide and drafted a pattern. I used some fabric left over from another project to make a practise one. I couldn't check the fit like I usually would have done for obvious reasons but, based on a few pictures I made some adjustments, and the end dress was a pretty good fit with room to grow. Mary is 3, nearly 4 so, I would hope it will fit for the next year at least making it aged 4.

YOU WILL NEED
Sewing Machine
Overlocker (optional)
Iron and Ironing Board
Sharp Scissor
Rotary Cutter (optional)
Pins
12" Zip
Pattern (you can download the PDF below)
Use a 1/2" seam allowance throughout.
METHOD
1. Print out the pattern and cut out all the pieces. I used a plain white fabric as the lining for the top. In addition to these pieces you will need 46cm x 80cm (front skirt), 2 46cm x 40cm (back skirt), 2 3" x full width of fabric strips (the ruffles). I used a white blender for the ruffles.

2. Start by folding over and stitching a double hem on one long edge of each of the ruffles.
Change the stitch length on your machine to the longest it will go. On the other long edge, sew two straight lines close to the edge leaving long tales at each end.

3. Pin front and back centre at the shoulders. Pin back and front sides at the shoulders. Sew and press open.

4. Find the centre of the ruffles and mark it. Use the long stitches you made on the ruffles to gather the ruffles to fit the centre pieces, matching the centre point with the shoulder seam. Taper of the ends of the ruffles off the edge of the centre panels. Pin into place and baste.

5. Now get your side pieces, match up the centre seam and pin it to the side of the centrepiece. Sew and then trim the access. Repeat steps 4 and 5 on both sides.

6. Sew the lining front to the back at the shoulder seams.
7. With right sides together pin the lining and main pieces. Match the seams and sew along the neckline and arm holes.

8. Trim and cut notches at the curves.

9. Open out the side seams and pin them, matching at the seams. Sew.

10. Cut a notch where the front and lining meet. Be careful not to snip through the stitching. Give it all a good press. I am not a master pattern designer so you may need to trim the bottom edges at this point. Pin the bottom edges and baste.

11. Pin the front and back skirt pieces at the sides with right sides together. Sew. At this point I have also finished off the seams. I have used the overlock on the side seams and back edges because I love the finish it gives. If you don't have an overlocker you can use a zig zag stitch. Press the seams to the back.


12. Turn your machine to the longest stitch and sew two stitch lines on the top edge of each panel, leaving long tales. Fold the front skirt in half, marking the centre.

13. Match the seams and centre of the skirt and top with right sides together. Pull your gather stitches, manipulating the gathers so they are even around the dress. Pin and sew the top to the skirt. Finish the raw edge on the overlocker or with a zig zag stitch.

14. Insert the zip. Pin the zip to edge of the back centre. Baste in place with a longer stitch on each side first to ensure it meets evenly before you sew it in properly. Finish off the raw edges. Press.

15. Press over the bottom edge twice and hem. Your dress is ready.

As I have said, I am not a professional pattern designer, this is just something I have drafted myself and it seems to have worked for me and hopefully you have been able to follow this tutorial successfully. If you have any questions at all, please get in touch. Or if you have given it a go, I would love to see!
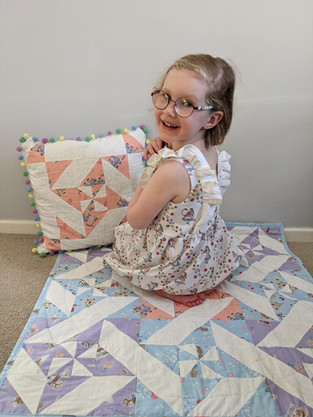
Here is the dress being beautifully modelled by Mary with the cushion and quilt I made from the same collection. Tutorials for these are also available on my blog.


Comments