
Baby Miffy Dress Pattern
- Katie Done
- Mar 7, 2019
- 4 min read
The Craft Cotton Company have launched this retro Miffy fabric to kick start 2019. I was given three designs to play with and have created this FREE baby dress pattern for your personal use. This is a small size suitable for a newborn and teamed with a vest, cardigan and tights it could be worn all year round so would make a great handmade gift for a new little lady.
I have used 1/2" seam allowance throughout. This is a reasonably simple pattern to follow with the most tricky bit being the button holes. Allow up to three hours to finish it.


YOU WILL NEED
Cutting mat and rotary cutter
Sharp scissors
4 buttons
Sewing machine
Iron and ironing board
1" wide elastic
Needle and thread
Over locker (or use zig zag stitch on your regular machine if you don't have one)
METHOD
1. Get the pattern here for the bib piece or use the following dimensions to help you draw it yourself.

Cut the following fabric:
2 front bib panels in white
7" high x 16" wide in pink
9" high x 16" wide pink
4 strips for straps (1.5" x 9.5") in pink
2 strips of white 4" high x 22" wide
1 strip of white 1.5" x 11.5" for the binding
2. Sew your first batch of pieces:
Bib- right sides together, sew the sides and top edge of the front bib.
Straps - right sides together sew the sides and bottom edge of the straps.
3. Clip your corners. Turn your straps the right way using something pokey to push the corners out. Turn your front top panel to the right way. Press.

4. Top stitch the straps and front bib piece. Use your over locker to finish the raw edge of the bib piece.
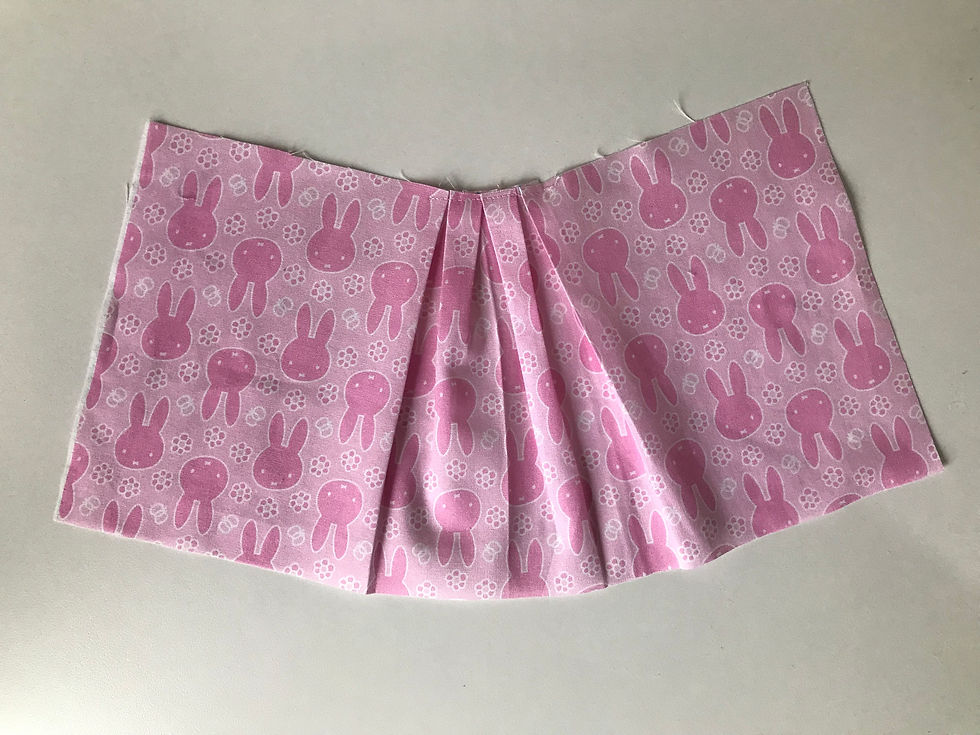
5. Find the centre point of your 7 x 16" piece. Mark 2" either side and use this as a the 3 centre points for your pleats. Fold the fabric either side by 1cm and meet at the mark you have made. Pin into place and baste.


6. To hide this raw edge, create some binding using the contrasting white fabric. It is only a small amount so you could use some ready made if you have any in your stash.
To make the binding just press wrong sides together, long ways and then press each long edge to the centre. Apply it to the top edge.

7. Fold the bib piece in half to find the centre and match it up with the centre of the front skirt. Pin in place so that it can be sewn along the existing stitch line. It may be fiddly, but to reduce stitch lines you could do this stage at the same point as the binding. Sew in place, back stitch at each end.

8. With your larger skirt piece, along the top edge, fold over 1.5cm and then fold over 3cm. This will be the casing for your elastic. Place your straps in the fold 4.5" from each edge and baste. Fold the straps over so they are pointing up. (I stitched the straps on after so I could work out where to put them but it was neater to tuck them in at this stage) Stitch all the way across.
9. Thread your elastic through the casing you have just created and pin to secure it at each end. Baste.
Your front and back skirt pieces could now be the same height.

10. With your long white strips, gather the top edge using two long straight stitch lines. Match the centre to the centre bottom of the skirt. Adjust the gather to fit and sew right sides together. Finish the raw edge with your over locker or zig zag stitch.

11. With right sides together, sew the front to the back at the sides. I have finished the edges using my over locker.
12. Now for the button holes. You could use KAM snaps if you have them and need to save some time but you just can't beat a good old fashioned button.

My Janome machine has a great button hole option and came with the foot. If you are looking into a new machine, this is a feature you definitely need to look for. All machines will be different so I won't go into detail on how to make your button holes. I would recommend you do a practise on some scraps before you start. This will also help you work out where to start but I have pictured where I started as a guide. Make sure you start the same distance from the edges on both sides.
15. My machine can add buttons but I still prefer to add them by hand. I have added two to each strap 3cm and 5.5cm from the end of the straps.

You are finished! If you give it a go, I would love to see so I can add you to my Your Gallery page.


Comments