
Colouring Pencil Carry Case
- Katie Done
- Aug 30, 2021
- 4 min read
Updated: Sep 15, 2024
George was recently invited to a birthday party. It was his first one in over 18 months, like with most things. The last time I was buying birthday gifts he was three, I had no idea what to get a five year old little girl. Thankfully I noticed her mum post on a Facebook comment that she likes colouring, so I picked up a colouring / sticker book, some pencils and smelly pens (loved those as a kid!). To make it a bit more fun I thought I would make a little carry case to keep it all together. I have been meaning to make something like this for ages, I just think it will be handy to pack and take with you if you are going away. I plan on making a smaller handbag size one for us too.
I made it the night before in around an hour using just some fun Craft Cotton fat quarters and bits I have laying around.

YOU WILL NEED
Colouring Book and Pencils
Bosal Foam
Assorted Fat Quarters (around 4)
Zip
Sewing Machine
Zipper Foot
Rotary Cutter and Mat (or scissors)
Iron and Ironing Board
Ruler
Fabric Pen

CUTTING
I have given the measurements for the fabric I have used, you can use any fabrics you like. Measurements are given width x height.
White Floral - 55cm x 38cm
Pink Stripes - 55cm x 38cm
Iron-in Bosal Interlining Foam - 55cm x 38cm (this adds strength and structure. You could use regular interfacing and wadding if you don't have any.)
Ballerina's - 38cm x 19cm
Purple Hearts - 38cm x 19cm
Blue Stripes - 20cm x 20cm (x2)
Colourful Flowers - 38cm x 22cm (x2)
METHOD
Iron the fusible foam onto the reverse of the white floral or front piece of fabric.
This case was made for an Isabelle so I used a small piece of glitter fabric I had to make an I for the front. Draw your letter on some Bondaweb (remember it will need to be back to front when drawn on the paper side). Iron on to the reverse of the glitter fabric or fabric of choice, cut it out and peel off the paper. Fold the front piece in half and position your letter in the centre front. Iron into place. I didn't want to use the iron directly on the glitter fabric so used another piece of fabric on top to protect it.

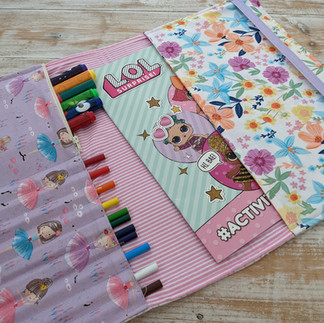
3. Next we will create the zip pocket. This may not look quite right but bear with me. I used a 20cm long zip (it was just what I had). Attach your zipper foot to your machine and sew it to one edge of the ballerina and purple heart fabric.

4. Get your striped blue fabric, this is the lining of your zip pocket, sandwich it between each side of the zip. The fabric needs to be right sides together with the zip and edge of the fabrics lined up. Sew into place and repeat on each side. When you open it up it will look like this.

5. Now line the blue stripes so they are right sides together and sew up the inside seam. Cut a diagonal on the corner so it is not too bulky.

6. Fold the ballerina fabric over to the right way and give it a good press.

7. With your two floral pieces, place them right sides together and sew the top long edge. If you had a larger piece of fabric you could just double the height and fold it in half. Fold it to the right way and press. Top stitch 1/4" from the edge.

8. Line up the floral pocket and the zip pocket that you have created on opposite sides of the pink stripe fabric. I have done the zip on the same side as the front (behind the letter I), in hindsight I would have done it on the back so the bulkiness of the pencils don't show on the front. Pin and baste around the edges.
9. Use a ruler and mark lines that are wide enough to fit your pencils in. Use a pen that disappears with water or heat.
10. Sew down the lines you have made to create the little pencil pockets, backstitch at the start and end.

11 On the righthand side, place a piece of slightly shorter elastic towards the edge and pin in place.

12. Put the front piece on top of the pocket piece with right sides together and sew around all four edges, leave a 3" gap to turn it out. Clip the corners, turn it out, press and top stitch around all 4 sides.

That is your pencil carry case done. I hope you enjoy making it and using up some fun fabrics in your stash. I would love to hear from you if you give it a go. If you would like more free tutorials, special offers and new fabric arrivals.


Comments